3D描画エンジンにはThree.jsが有名ですが、影が正しく描画されなかった事もありBABYLON.jsを使っています。
当ブログ記事でBlenderによる3Dデザインの作成も扱っているので、BABYLON.jsによるブラウザ表示を行っていきます。
今回は基本的なBABYLON.jsを使った表示までを行います。
BABYLON.jsで3Dの表示
BABYLON.js公式にはサンドボックスが準備されており、お試しには向いていますが、基本を勉強するため環境を一から作成していきます。
初期設定
ブラウザで表示するため、HTMLに描画対象の「canvas」タグを記述します。
<!DOCTYPE html>
<html lang="ja">
<head>
	<meta  http-equiv="Content-Type" content="text/html" charset="utf-8"/>
	<title>Babylon Test</title>
	<script src="https://cdn.babylonjs.com/babylon.js"></script>
	<style>
		#renderCanvas {
			width: 100%;
			height: 100%;
			touch-action: none;
		}
	</style>
</head>
<body>
	<canvas id="renderCanvas"></canvas>
</body>
</html>
次にJavaScriptにて上記で作成した「canvas」タグを引数に、BABYLON.jsのエンジンを作成します。
まず、IDより「canvas」タグを取得し、本値を引数にBABYLONのエンジンクラスを生成します。
canvas = document.getElementById("renderCanvas");
engine = new BABYLON.Engine(canvas, true);
環境設定
BABYLONのエンジンが作成出来たら、舞台となる「scene」を作成します。
まだ地面は有りませんが、重力と衝突判定も有効にします。
scene  = new BABYLON.Scene(engine);
scene.gravity = new BABYLON.Vector3(0, -0.98, 0);
scene.collisionsEnabled = true;
「scene」は宇宙空間の様な場所なので、ここに観測点となるカメラ、太陽等の光源と地面を設置します。
カメラの種類には定点の周りを回るカメラ等色々有りますが、ここでは自由に移動できる「UniversalCamera」を、また、光源は太陽光の様な「DirectionalLight」と、光の回折として「HemisphericLight」の二種類を作成します。
カメラと地面には衝突判定等も付与します。
camera = new BABYLON.UniversalCamera ("Camera", new BABYLON.Vector3(0,  1.2, -5), scene);
lightD = new BABYLON.DirectionalLight("LightD", new BABYLON.Vector3(0,    0,  0), scene);
lightH = new BABYLON.HemisphericLight("LightH", new BABYLON.Vector3(0, 1000,  0), scene);
oGround  = BABYLON.MeshBuilder.CreateGround("Ground", {width: 100, height:100});

camera.ellipsoid        = new BABYLON.Vector3(0.25, 0.8, 0.25);
camera.checkCollisions  = true;
camera.applyGravity     = true;
camera.speed            = 0.3;
camera.attachControl(this.canvas, true);
camera.cameraDirection  = new BABYLON.Vector3(0, 1.7, 0);
lightD.intensity        = 0.8;
lightH.intensity        = 0.6;
oGround.checkCollisions = true;
このままでは地面だけなので、サンプルにオブジェクトを浮かべます。
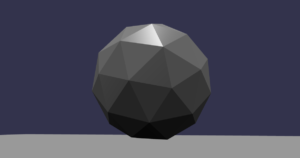
var oSph   = BABYLON.Mesh.CreateIcoSphere("Sphere", {radius:0.5, subdivisions:2}, scene);
oSph.position.y = 2;
oSph.checkCollisions = true;
表示するオブジェクトが一通り設定できましたので、描画処理を以下のコードで行います。
window.addEventListener("resize", function(){engine.resize();});
engine.runRenderLoop(function(){scene.render();});
現状では静止画と区別が付かないため、オブジェクトを回転させてみます。
本コードを上記描画処理の前に追加します。
scene.registerBeforeRender(function(){
	oSph.rotation.y += 0.001*scene.getEngine().getDeltaTime();
	oSph.rotation.x += 0.001*scene.getEngine().getDeltaTime();
});
以上で、以下の様な画面が表示されるはずです。
デバッグ
オブジェクトや光源等、シーンに追加したパラメータ等は描画画面上でデバッグできます。
以下のコードを追加すると、デバッグ画面が表示されます。
scene.debugLayer.show();次回は、Blenderを用いたglTF形式での出力と、BABYLON.jsでの表示を行っていきます。